How to Install Windows 10 From Pendrive/USB Easily
If your computer doesn’t have a DVD drive, or you don’t have a Windows 10 installation disc, there’s no need to panic. You can still install Windows quickly and easily with the help of a Pendrive (USB flash drive). In fact, using a USB is now the most common method because it’s faster, more reliable, and works on almost any laptop or desktop.
Installing Windows 10 from a USB drive takes less time compared to a traditional DVD, and the process is straightforward once you have the right tools. In this guide, we’ll walk you step by step through how to install Windows 10 from Pendrive/USB, using Microsoft’s official tool and some alternative options.
Why Install Windows 10 From a USB?
Using a USB drive for Windows installation has many advantages:
Portable – A USB is small and easy to carry around, unlike bulky DVDs. Why Install Windows 10 From a USB?
Faster installation – The installation process from a USB drive is much quicker.
Compatibility – Almost all modern PCs and laptops can boot from a USB drive.
Reusable – Unlike DVDs, you can reuse your USB drive multiple times.
No need for a DVD drive – Most modern ultrabooks and compact desktops don’t even come with optical drives.
For these reasons, creating a bootable USB is the easiest and most convenient way to install Windows 10.
Things You Need Before You Start
Before you begin, make sure you have the following:
A working Windows 10 ISO file – You can download this directly from Microsoft’s official website.
A USB drive with at least 8GB storage – The drive will be formatted, so back up your data before proceeding.
A stable internet connection – Required for downloading the ISO file and Media Creation Tool.
Windows 10 Media Creation Tool – A free program from Microsoft that helps create a bootable USB.
Having these ready will ensure a smooth and hassle-free installation.
Step 1: Create a Bootable Windows 10 USB
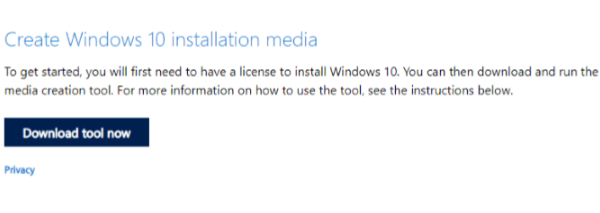
The first step is to turn your Pendrive into a bootable USB installer. Microsoft makes this easy with the Windows Media Creation Tool, which handles everything automatically.
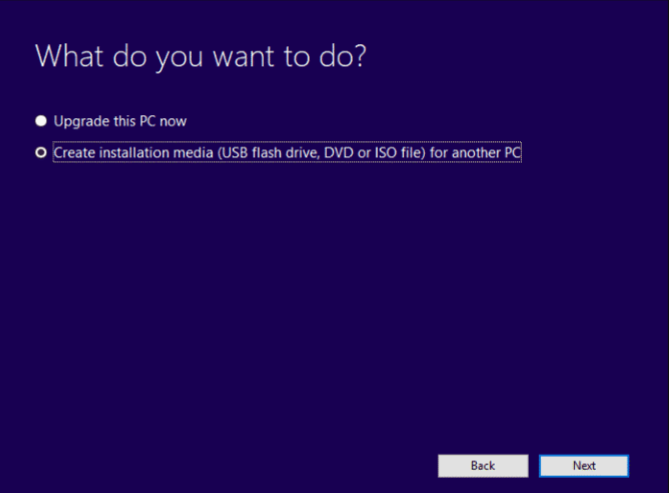
2. Open the tool and select “Create installation media (USB flash drive, DVD, or ISO file) for another PC.”
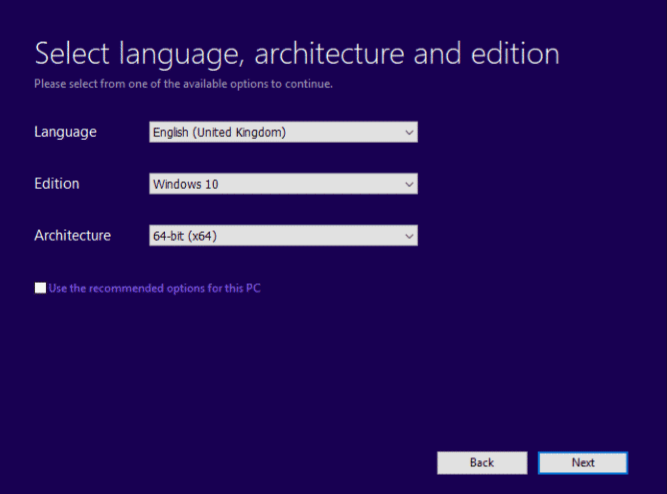
3. Choose the correct Language, Edition, and Architecture (32-bit or 64-bit) for your system.
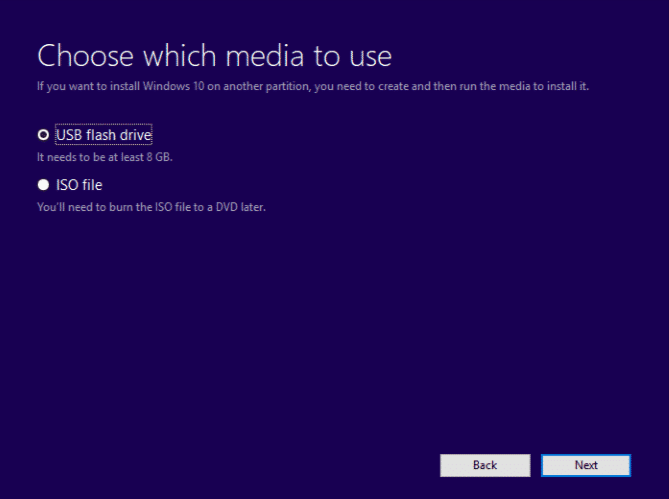
4. When asked which media to use, pick “USB Flash Drive.”
5. The tool will download Windows 10 and create a bootable USB for you.
Once the process finishes, your USB drive will be ready to install Windows 10
Step 2: Other Tools to Create Bootable USB
While Microsoft’s Media Creation Tool is the most reliable, sometimes it might fail or you may prefer alternatives. Luckily, there are other great tools to create a bootable USB drive:
Rufus – One of the most popular and lightweight USB bootable creation tools.
UNetbootin – Works on Windows, macOS, and Linux for creating bootable drives.
Etcher – A user-friendly tool with a clean interface for making bootable USBs.
These tools are easy to use and allow more flexibility, especially if you want to install Linux or another operating system besides Windows.
Step 3: Install Windows 10 From Pendrive/USB
Once your USB drive is ready, follow these steps to install Windows 10:
1. Insert the bootable USB drive into the computer where you want to install Windows 10. 2. Restart the PC and enter the BIOS/UEFI setup. You can usually do this by pressing keys like F2, F10, DEL, or ESC when the computer starts. 3. In the BIOS/UEFI, set the USB drive as the primary boot device. 4. Save the settings and restart your computer. 5. When prompted, press any key to boot from USB. 6. The Windows 10 Setup Wizard will launch. Follow the on-screen steps to:
Choose your language, region, and input method.
Accept the license terms.
Select whether you want a custom installation (fresh install) or an upgrade.
Pick the hard drive or partition where you want to install Windows.
Windows will begin copying files, and your computer will restart a few times during the process. Once completed, you’ll be guided through the initial setup, where you can create a user account, choose privacy settings, and connect to Wi-Fi.
Common Issues and Tips
Here are a few tips to avoid problems during installation:
Backup your files – Installing Windows will erase everything on the selected drive, so make sure to back up important data.
Check PC compatibility – Ensure your system meets the minimum requirements for Windows 10.
Use a quality USB drive – Faulty or slow drives can cause installation errors.
Keep the laptop charged – If you’re installing on a laptop, plug it into power during installation.
Final Words
Learning how to install Windows 10 from Pendrive/USB is a must for anyone who uses a PC. It’s the most convenient way to install or reinstall Windows, especially if you don’t have a DVD drive. With just a Windows 10 ISO file and a bootable USB, you can set up your computer in less time and with greater reliability.
Whether you use Microsoft’s Media Creation Tool or third-party software like Rufus, the process is simple and beginner-friendly. So, the next time you need to reinstall or upgrade Windows, skip the DVDs and go with a USB—it’s faster, portable, and works on nearly every modern computer